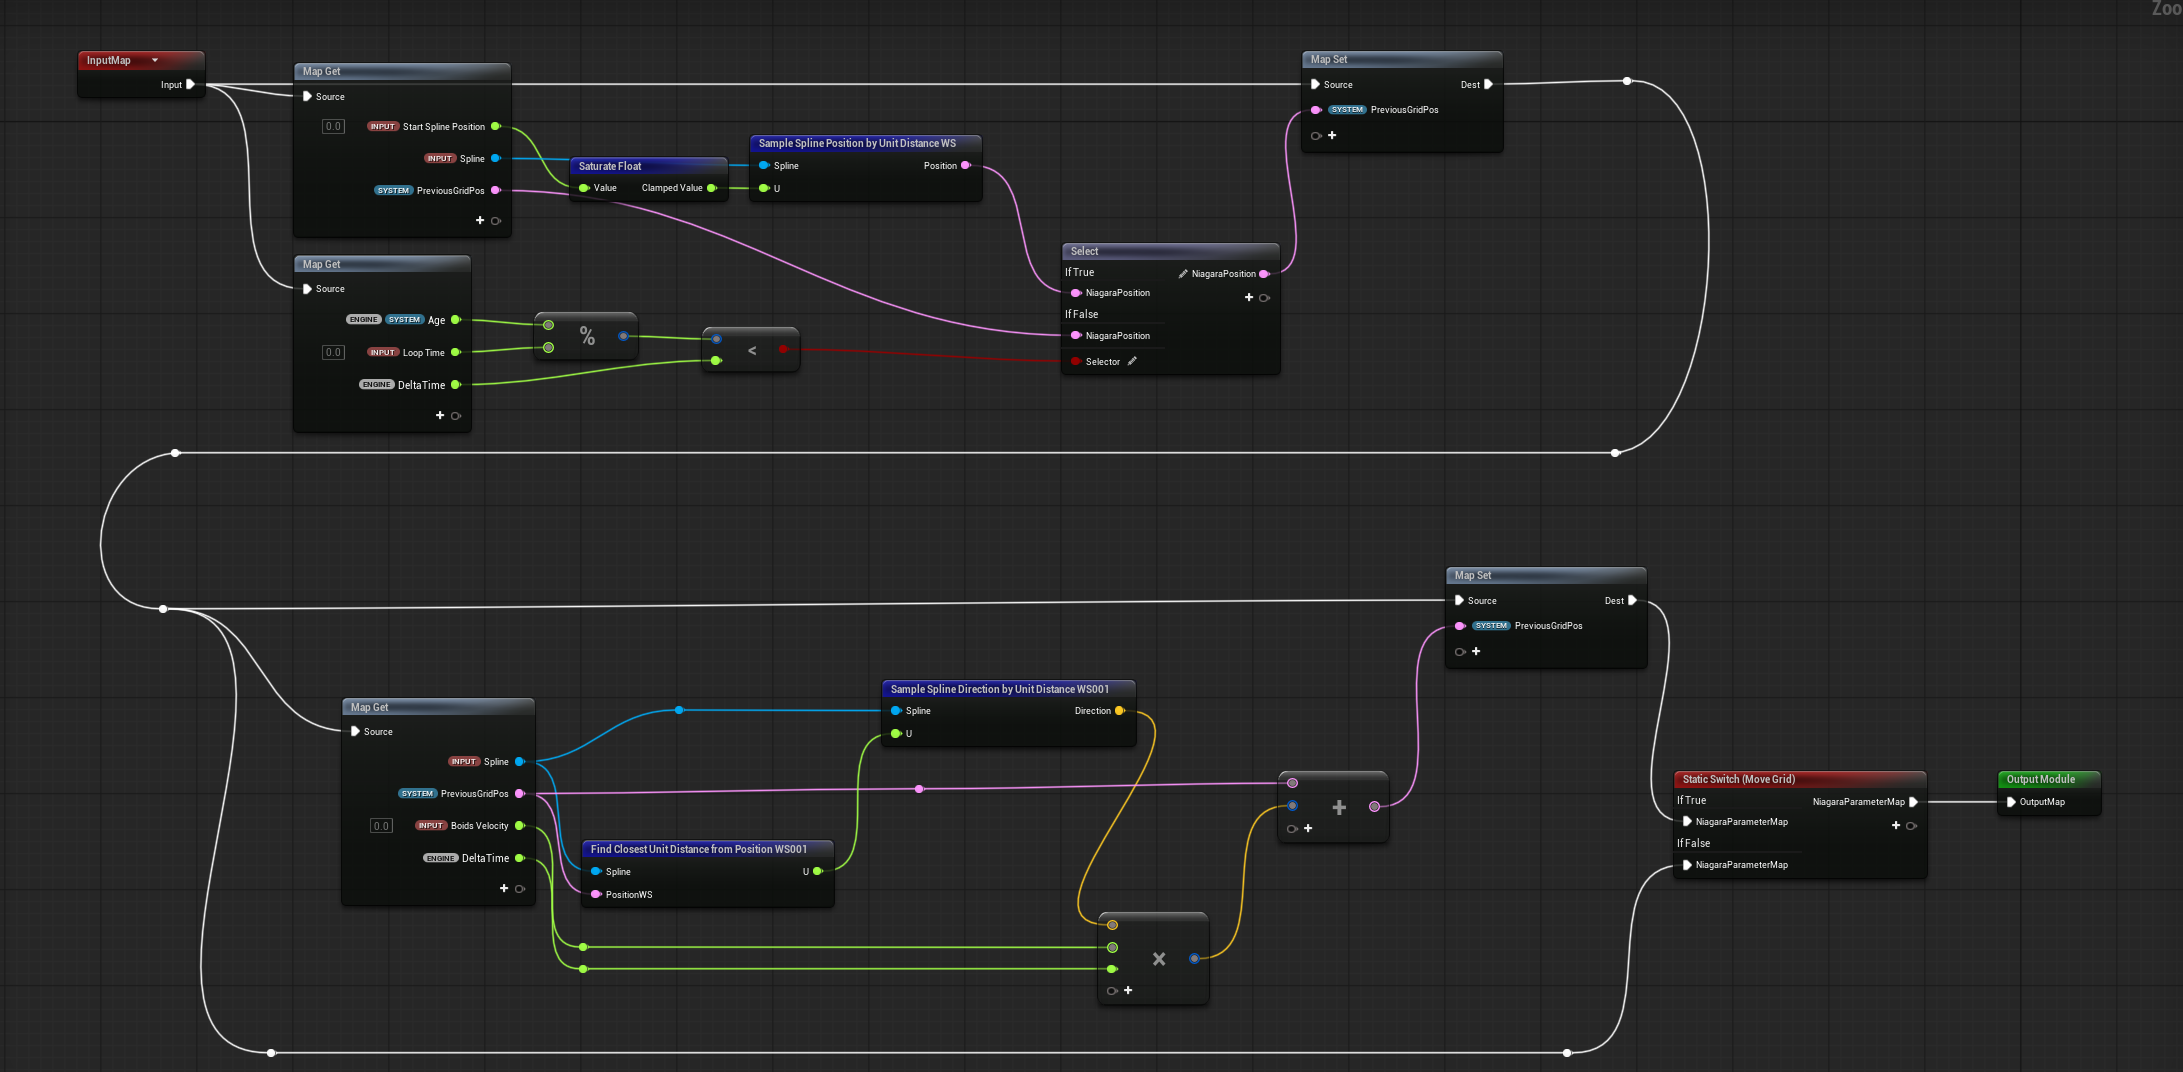
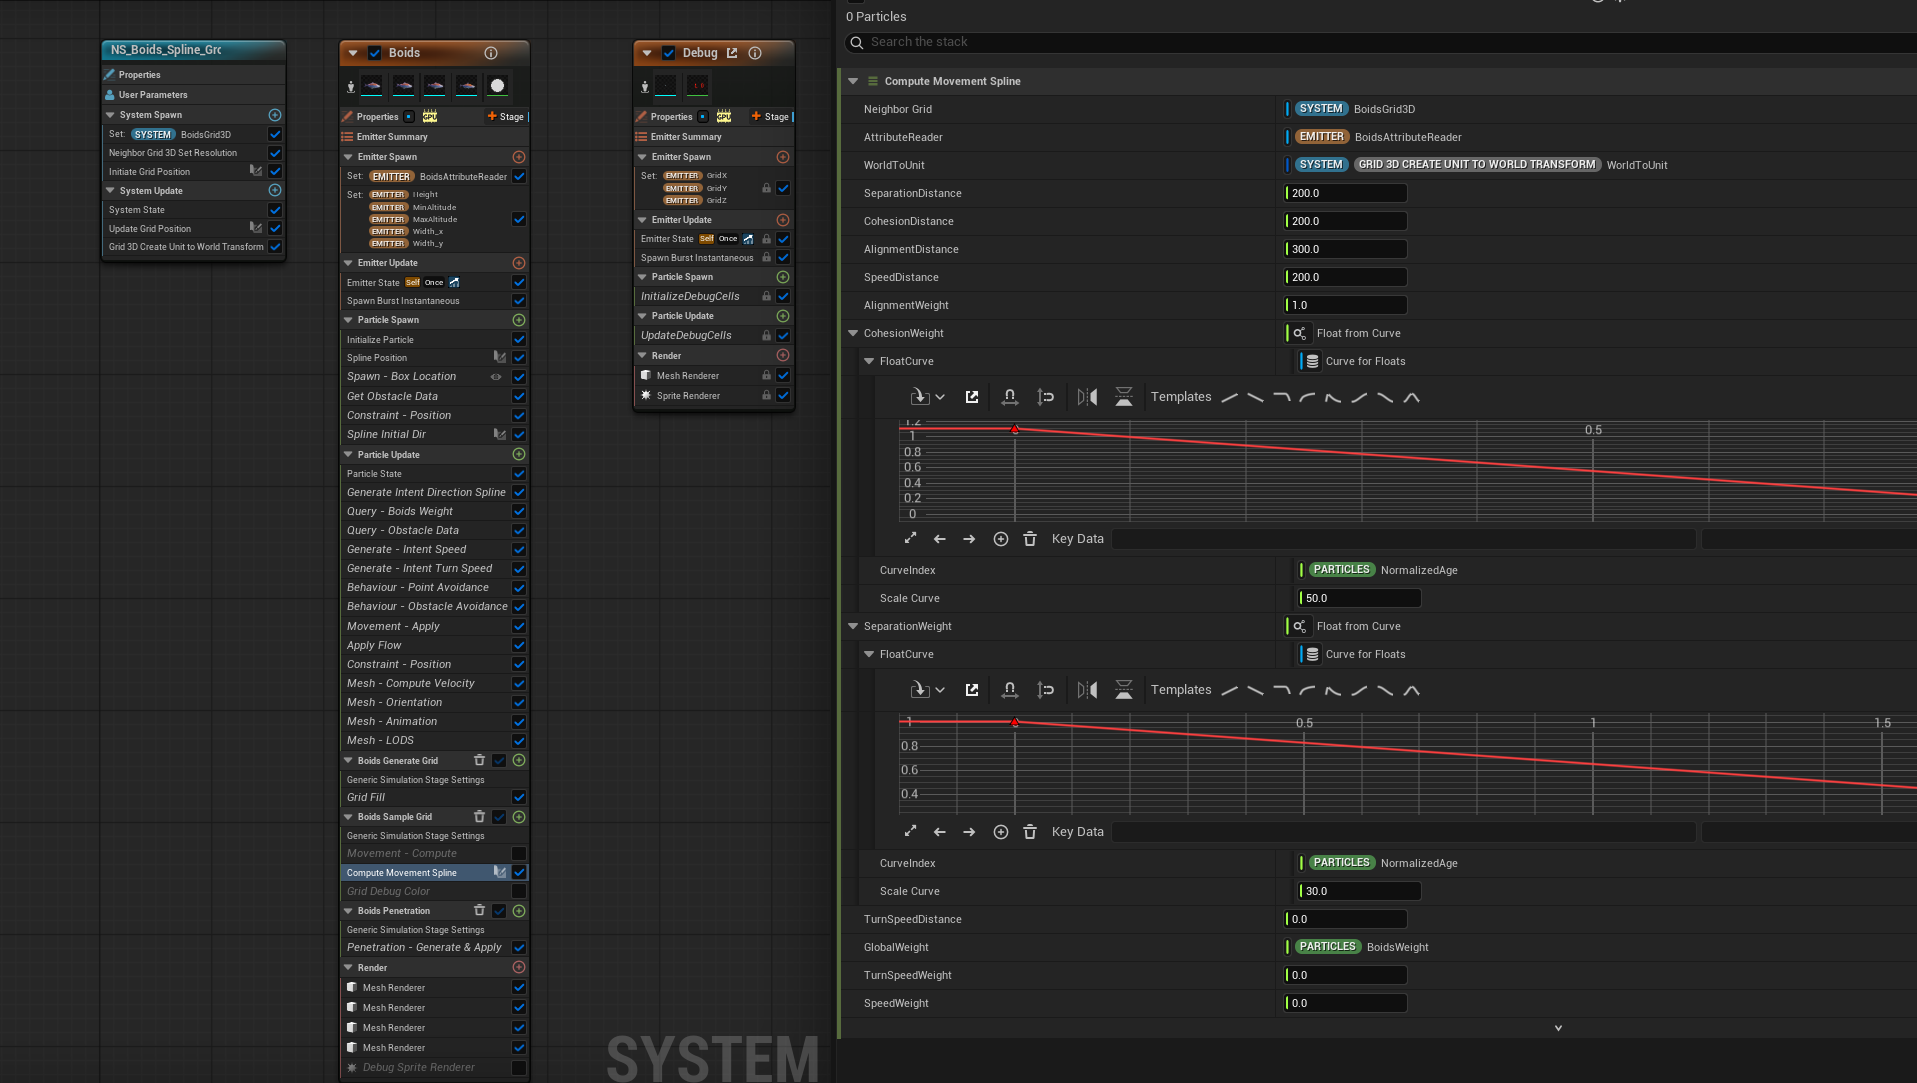
The movement is not so complex, it has simple mechanics but it was very hard to achieve a satisfying result and even now after several weeks of iterations (at first it was physics based) it can be improved a lot.
Almost every aspect of the movement is based on float curves (second slide), I chose them for two main reasons, they give smoother movement control and they are very easy to tweak from a designer point of view,
of course I needed to use variables too, that I described in the documentation seen before.
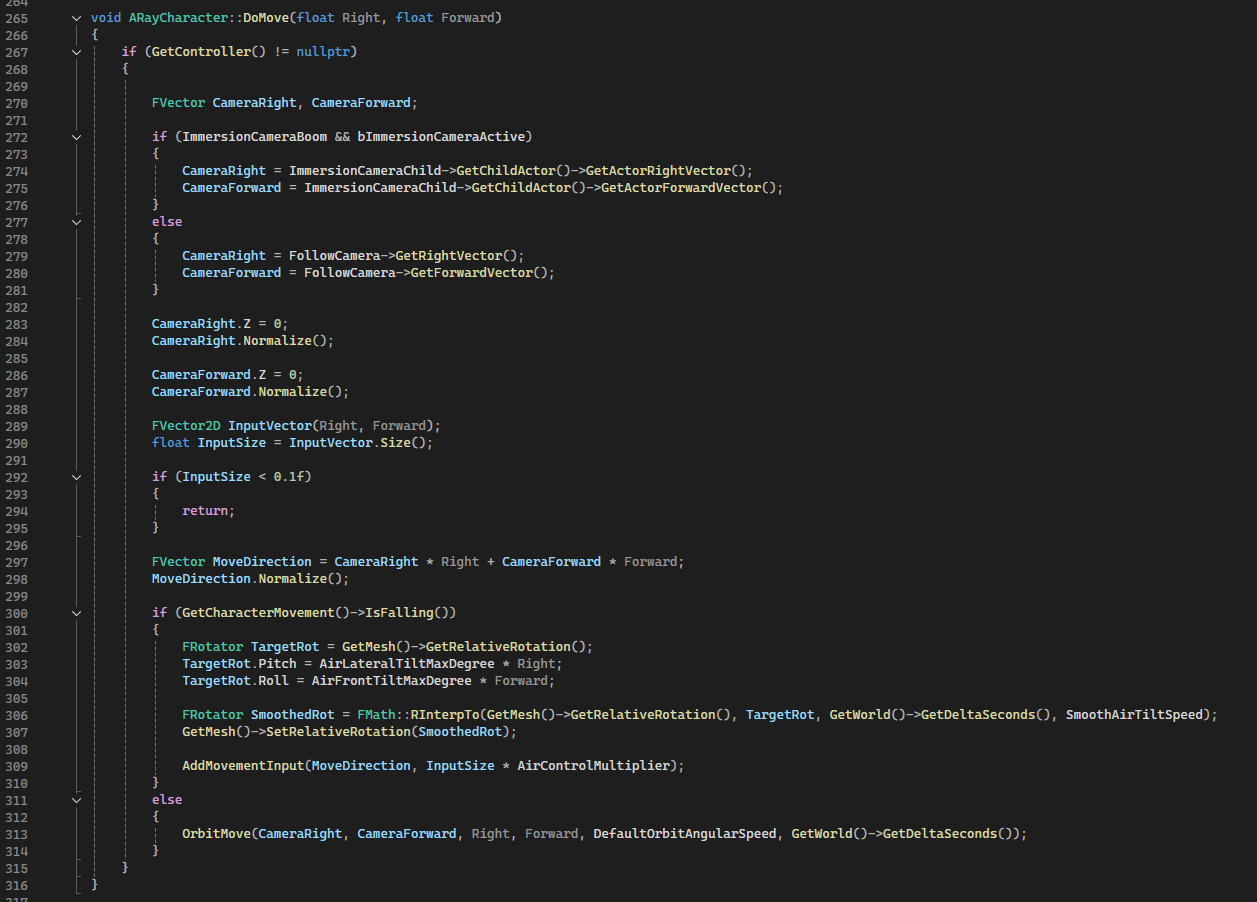
DoMove Implementation
Orbit Move call
Sword of the sea reference
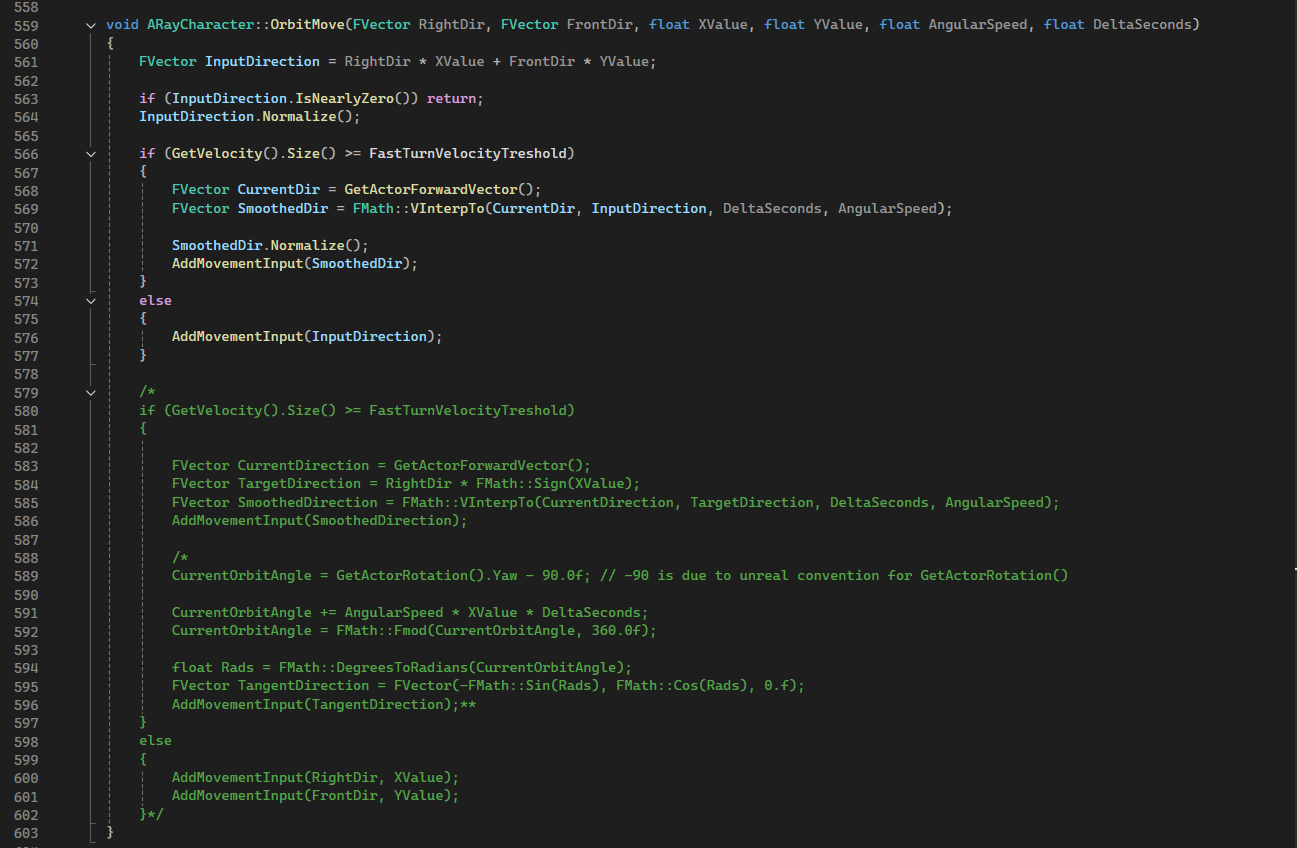
One of the most important function for the ray movement is OrbitMove(...), it has this name because when looking at Sword of the sea
I noticed that when pressing the lateral keys the character drew a circle with its subsequent positions and it reminded me satellites in orbit.
For this same reason as can be seen in the first image, commented, there is my first implementation, that added mov. inputs in a direction tangent to a circle (it didn't feel right).
After studying SoS deeper I realised that movement was connected to the camera position and direction,
and I implemented it in the newer version.
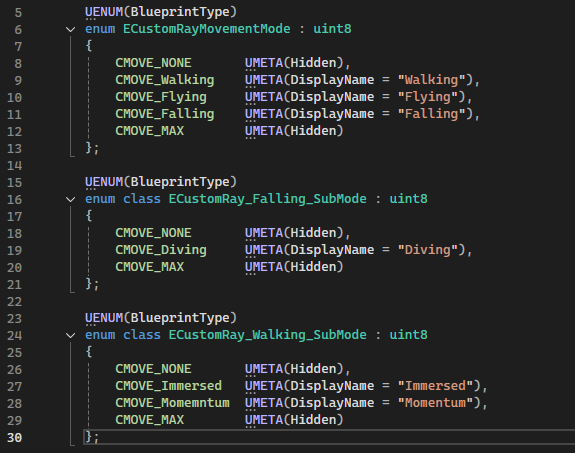
Examples of Ray movement modes
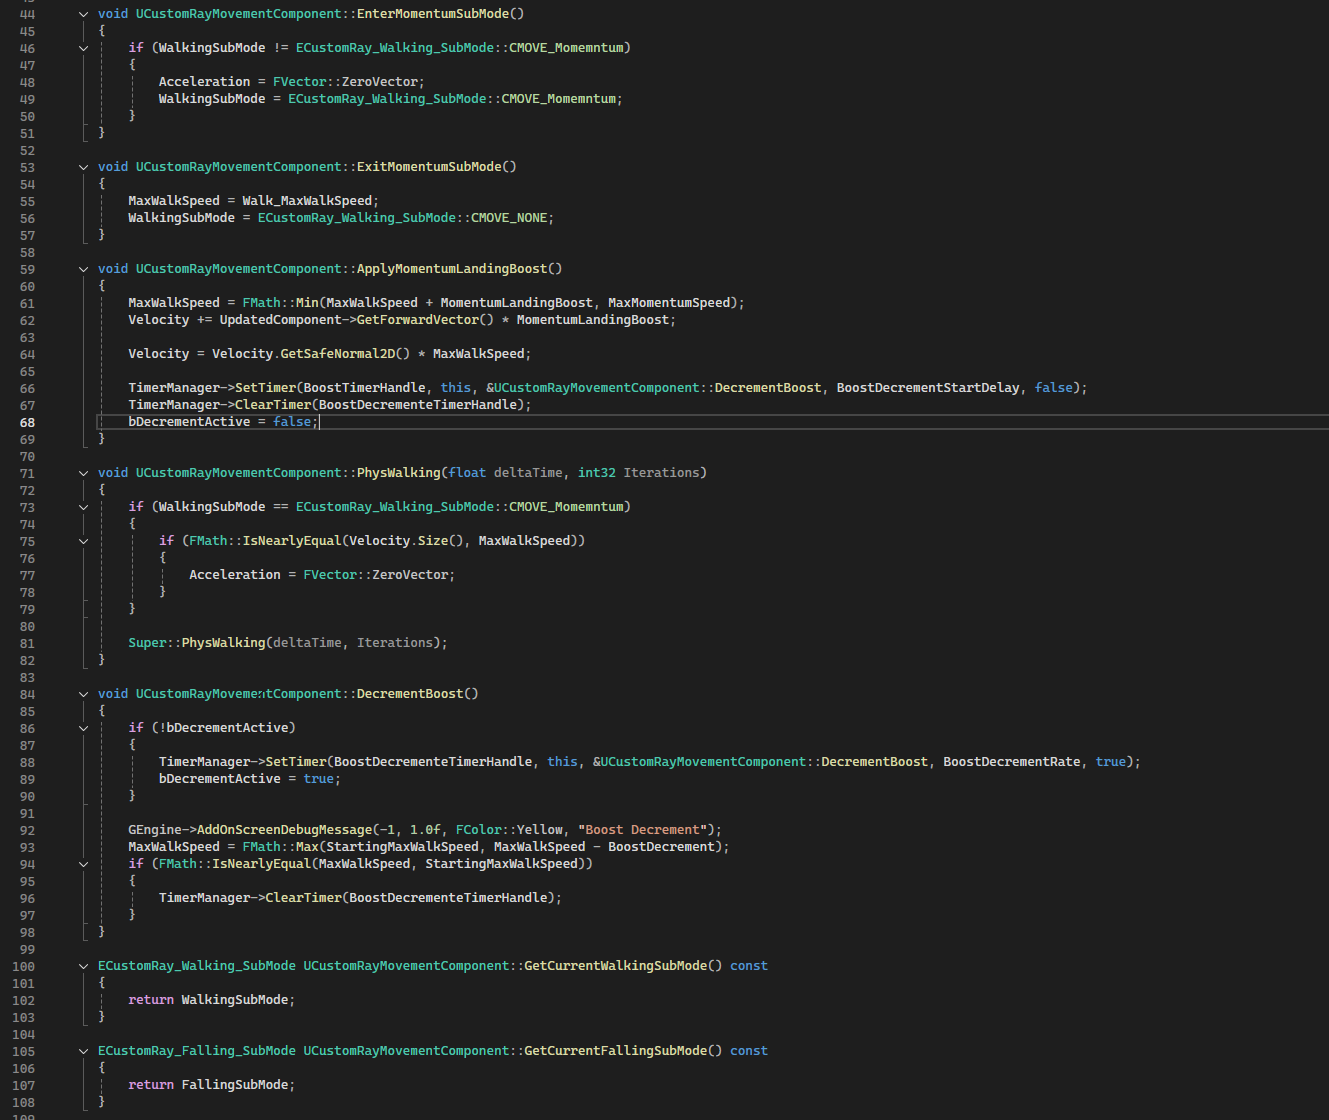
In this section, I explore the setup of the custom Character Movement Component (CMC). Although we didn't end up using it extensively, since the different Ray states don't behave in distinct ways.
I think it's still worth looking how it's structured, because this organization could be very useful if we decide to modify the movement system in the future.
I defined different enums to represent custom modes and sub-modes. For each mode and sub-mode, I implemented corresponding Enter and Exit functions and only for each major mode Phys functions.
The slides include an example of this structure applied to a “momentum boost” feature, which we ultimately decided to not use.
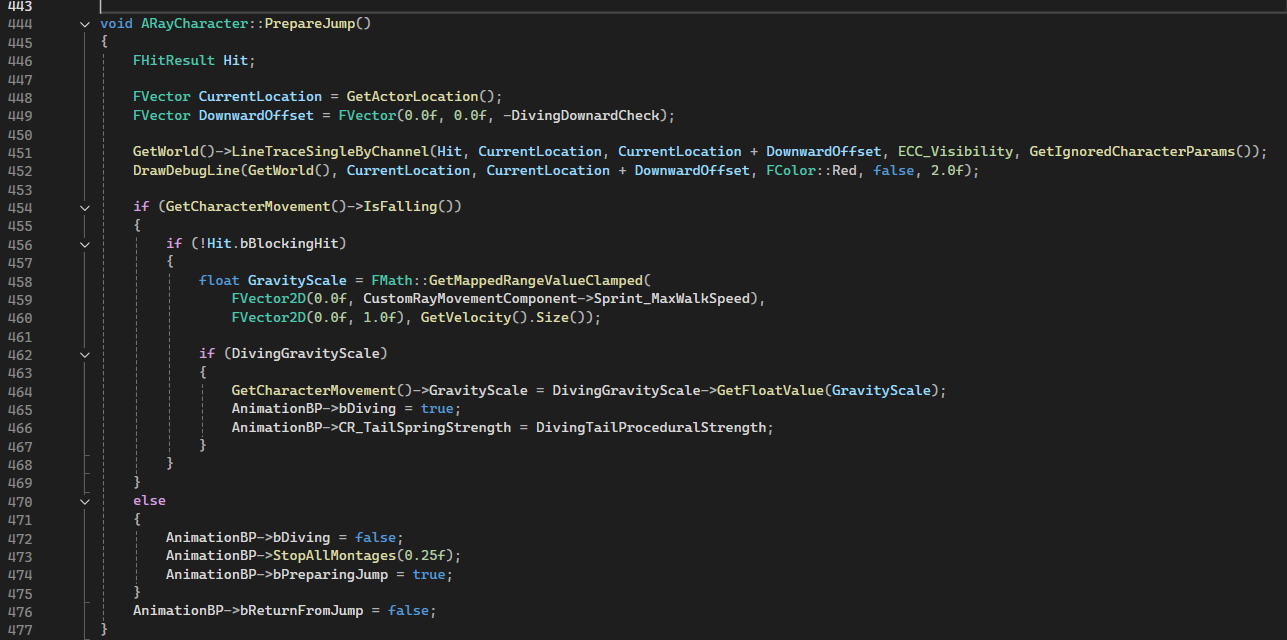
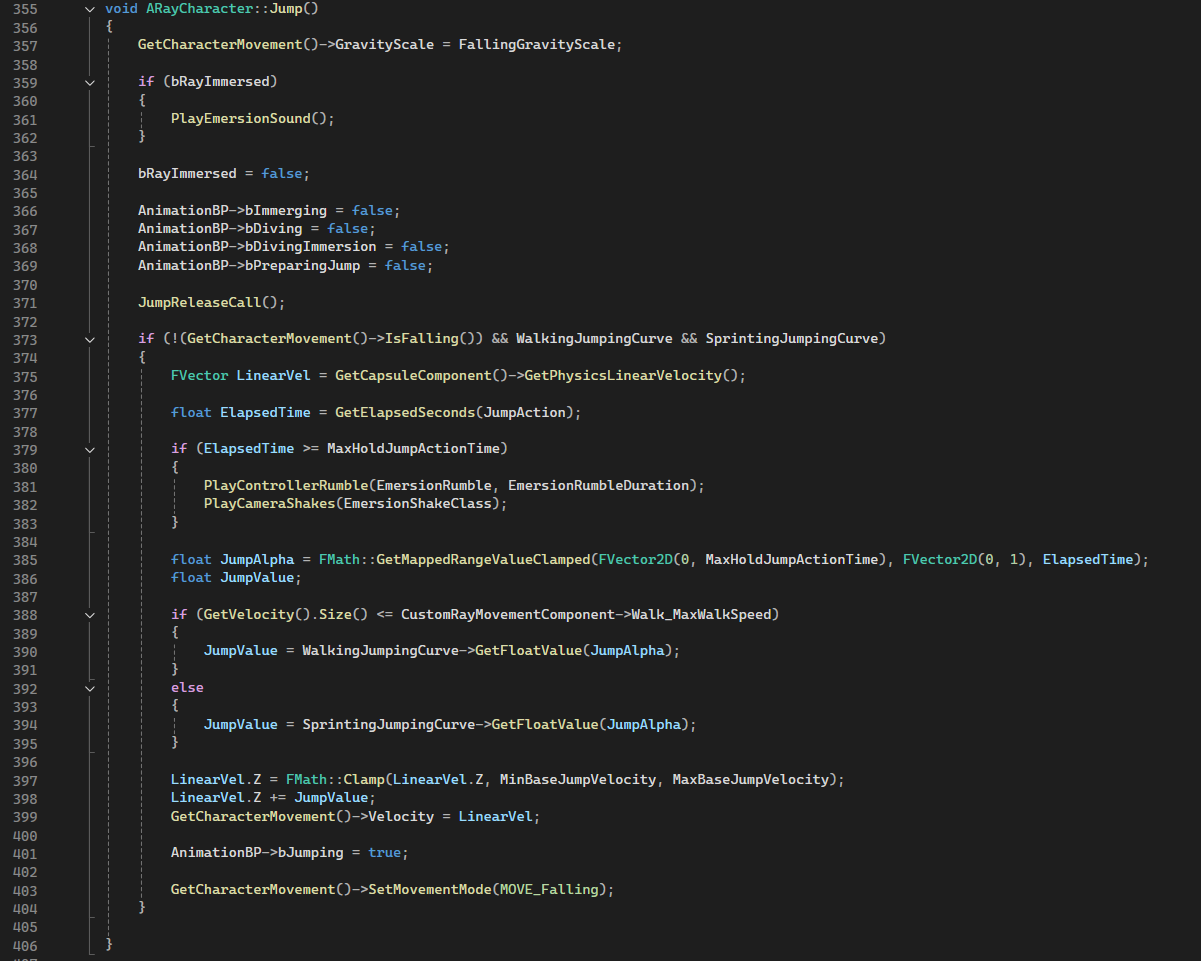
The jump can be holded to increase the height, at the maximum holding time the character performs a different animation.
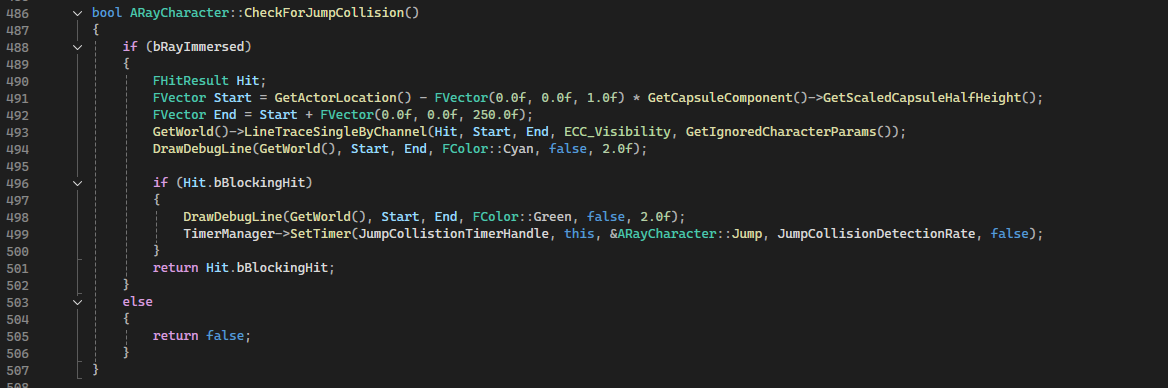
In PrepareJump() a ray cast is performed to avoid the possibility of spamming the dive button, you can dive only if the the ray doesn't hit the terrain meaning you are distant enough.
Jump(), which starts at the release, calculates the height based on the character velocity and in order to properly jump along slopes I add the z component of the linear velocity because the standard Unreal
movement component set it to zero every frame, it is also useful for the feeling, the higher you go the higher you jump (for this same reason is clamped).
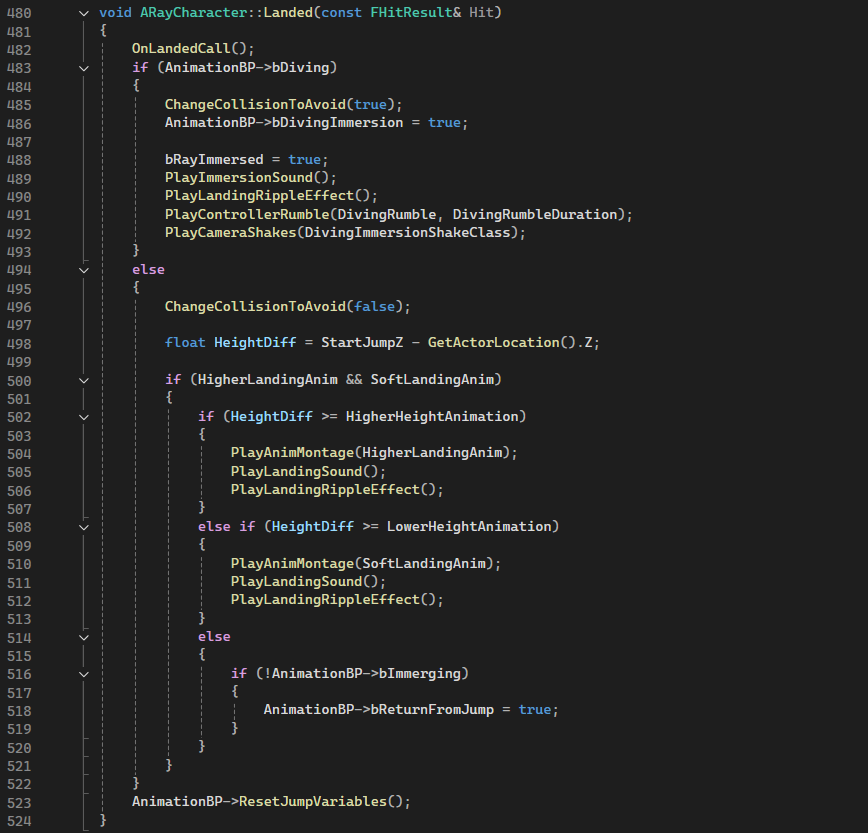
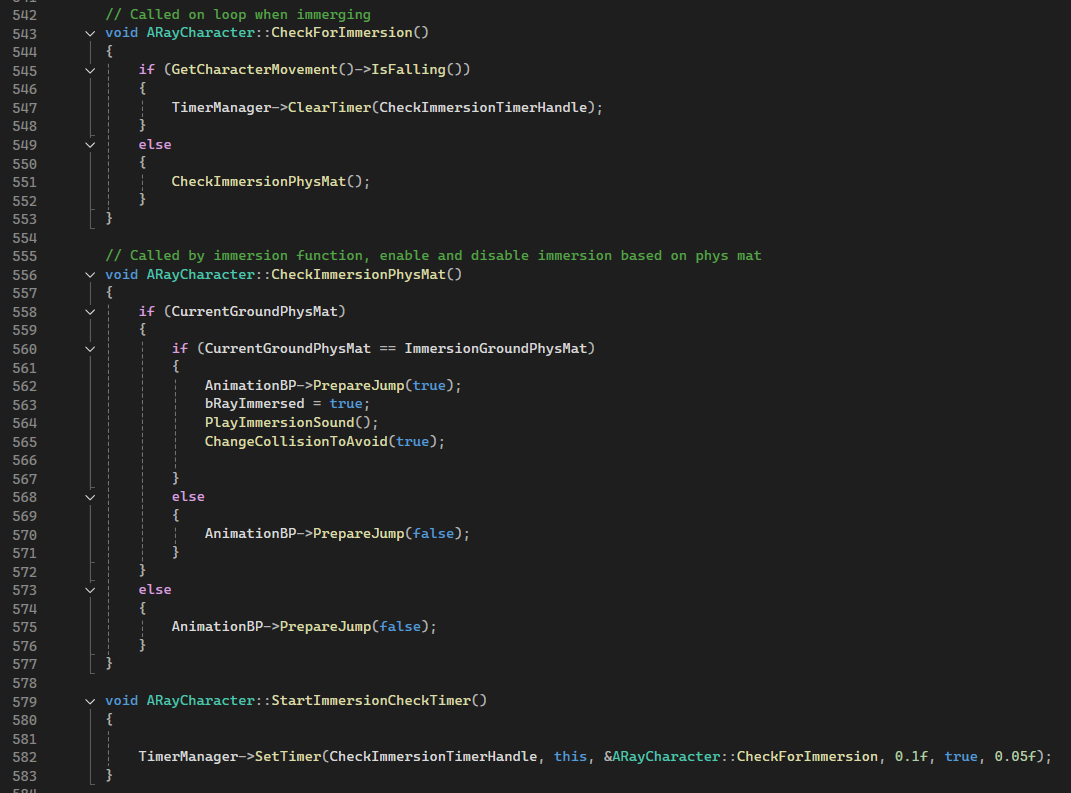
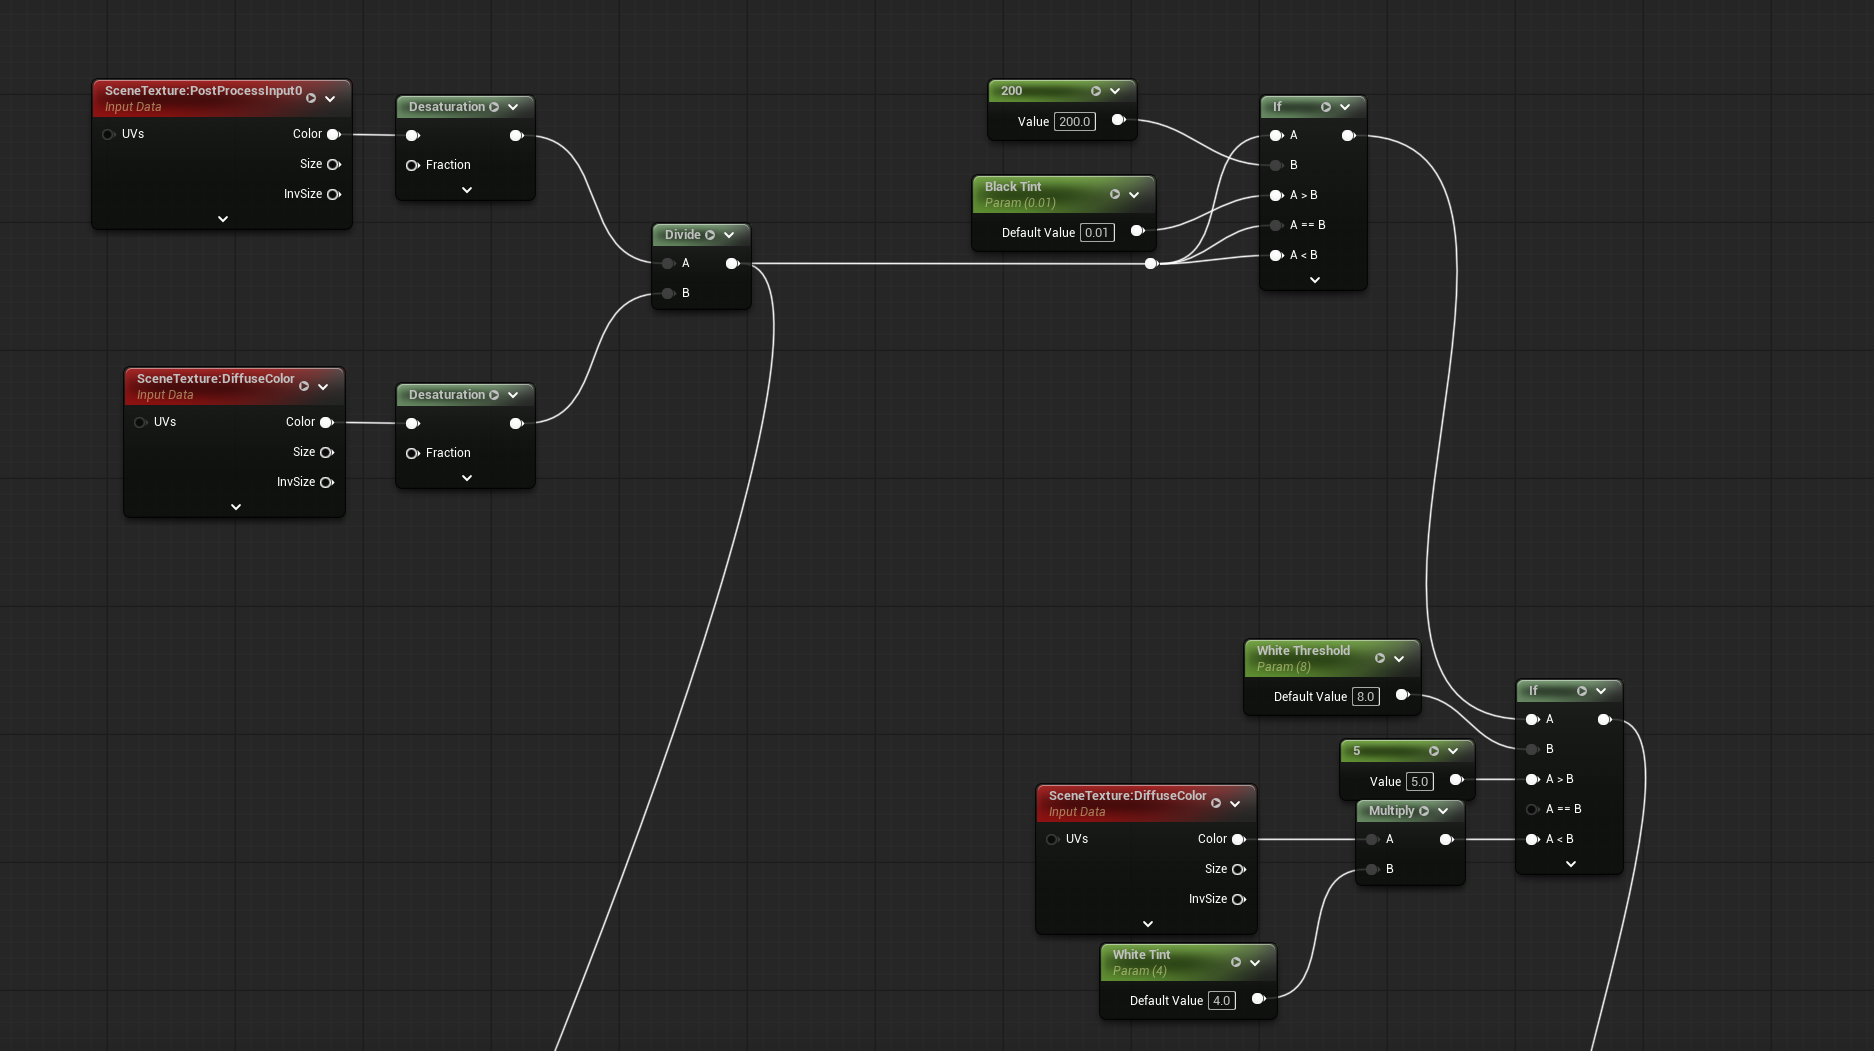
Landing with Phys materials
On landing depending on if in the diving state and depending on the height of the jump start position, it plays different feedbacks reactions (the vertex ripple effect, different animations, sounds).
By using a physical material, we can define the surfaces the ray can submerge into (they are used in both 'On Landed' and 'Prepare Jump').
When the player holds down the button, a timer starts and checks the phys mat to either make the manta surface or submerge again.
// Parameters -----------
// Air Control
UPROPERTY(EditAnywhere, BlueprintReadWrite, Category = "Air")
float AirControlMultiplier = 2.0f;
// ----------- Jump
UPROPERTY(EditAnywhere, BlueprintReadWrite, Category = "Jump")
UCurveFloat* WalkingJumpingCurve;
UPROPERTY(EditAnywhere, BlueprintReadWrite, Category = "Jump")
UCurveFloat* SprintingJumpingCurve;
UPROPERTY(EditAnywhere, BlueprintReadWrite, Category = "Jump")
UCurveFloat* DivingGravityScale;
UPROPERTY(EditAnywhere, BlueprintReadWrite, Category = "Jump")
UCurveFloat* ImmergingRumbleScale;
UPROPERTY(EditAnywhere, BlueprintReadWrite, Category = "Jump", meta = (ClampMin = "0.0", ClampMax = "4000.0", UIMin = "0.0", UIMax = "4000.0"))
float MaxBaseJumpVelocity = 3000.0f;
UPROPERTY(EditAnywhere, BlueprintReadWrite, Category = "Jump", meta = (ClampMin = "-2000.0", ClampMax = "0.0", UIMin = "-2000.0", UIMax = "0.0"))
float MinBaseJumpVelocity = -1000.0f;
UPROPERTY(EditAnywhere, BlueprintReadOnly, Category = "Jump", meta = (ClampMin = "0.0", ClampMax = "10.0", UIMin = "0.0", UIMax = "10.0"))
float MaxHoldJumpActionTime = 2.0f;
UPROPERTY(EditAnywhere, BlueprintReadOnly, Category = "Jump", meta = (ClampMin = "0.0", ClampMax = "10.0", UIMin = "1.0", UIMax = "10.0"))
float FallingGravityScale = 3.5f;
UPROPERTY(EditAnywhere, BlueprintReadOnly, Category = "Jump", meta = (ClampMin = "0.0", ClampMax = "10.0", UIMin = "1.0", UIMax = "10.0"))
float NormalGravityScale = 2.0f;
UPROPERTY(EditAnywhere, BlueprintReadWrite, Category = "Jump")
float StartJumpZ = 0.0;
UPROPERTY(EditAnywhere, BlueprintReadWrite, Category = "Jump")
float HigherHeightAnimation = 1700.0f;
UPROPERTY(EditAnywhere, BlueprintReadWrite, Category = "Jump")
float LowerHeightAnimation = 200.f;
UPROPERTY(EditAnywhere, BlueprintReadWrite, Category = "Jump", meta = (ClampMin = "200.0", ClampMax = "2000.0", UIMin = "200.0", UIMax = "2000.0"))
float DivingDownardCheck = 600.0f;
UPROPERTY(EditAnywhere, BlueprintReadWrite, Category = "Jump", meta = (ClampMin = "100.0", ClampMax = "500.0", UIMin = "100.0", UIMax = "500.0"))
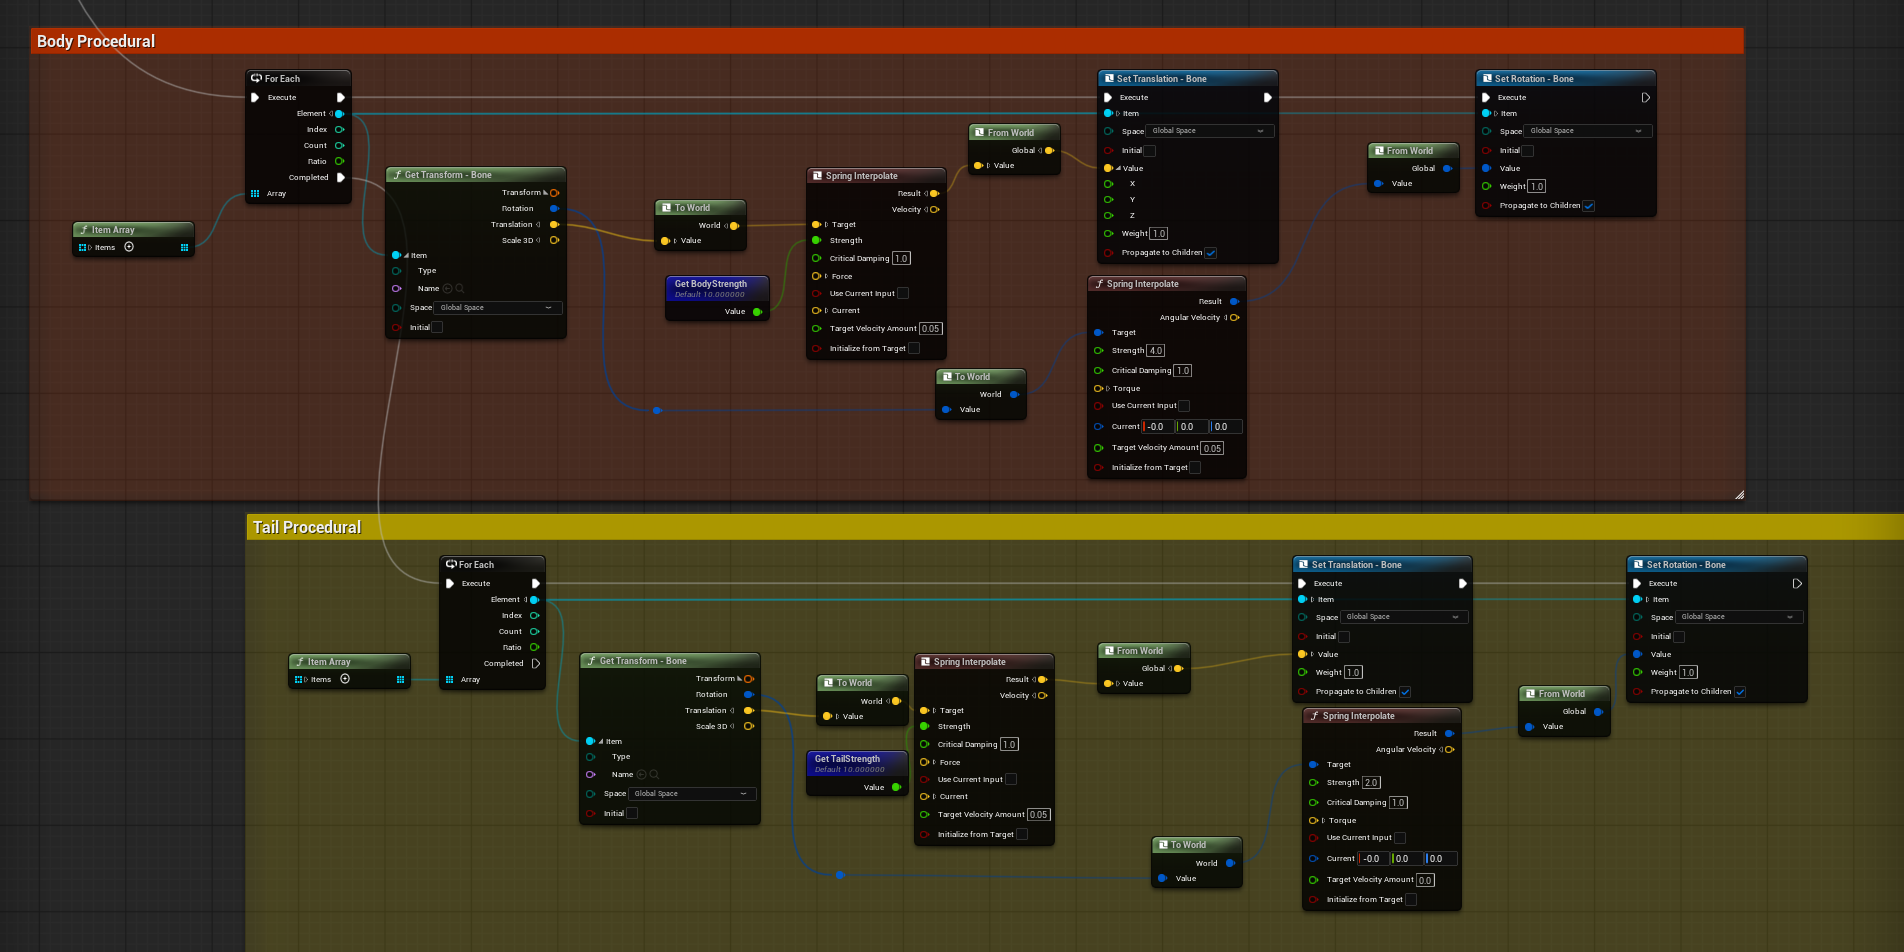
float DivingTailProceduralStrength = 200.0f;
UPROPERTY(EditAnywhere, BlueprintReadWrite, Category = "Jump", meta = (ClampMin = "0.0", ClampMax = "5.0", UIMin = "0.0", UIMax = "5.0"))
float EmersionRumble = 0.25f;
UPROPERTY(EditAnywhere, BlueprintReadWrite, Category = "Jump", meta = (ClampMin = "0.0", ClampMax = "5.0", UIMin = "0.0", UIMax = "5.0"))
float DivingRumble = 0.1f;
UPROPERTY(EditAnywhere, BlueprintReadWrite, Category = "Jump", meta = (ClampMin = "0.0", ClampMax = "5.0", UIMin = "0.0", UIMax = "5.0"))
float EmersionRumbleDuration = 0.3f;
UPROPERTY(EditAnywhere, BlueprintReadWrite, Category = "Jump", meta = (ClampMin = "0.0", ClampMax = "5.0", UIMin = "0.0", UIMax = "5.0"))
float DivingRumbleDuration = 0.2f;
UPROPERTY(EditAnywhere, BlueprintReadWrite, Category = "Jump")
bool bActivateImmergingRumble = false;
// ----------- Orbital Movement
UPROPERTY(EditAnywhere, BlueprintReadWrite, Category = "Orbital Movement")
float DefaultOrbitAngularSpeed = 65.0f;
UPROPERTY(EditAnywhere, BlueprintReadWrite, Category = "Orbital Movement")
float KeyboardDiagonalInputSpeed = 25.0f;
UPROPERTY(EditAnywhere, BlueprintReadWrite, Category = "Orbital Movement")
UCurveFloat* DiagonalMovementCurve;
UPROPERTY(EditAnywhere, BlueprintReadWrite, Category = "Orbital Movement")
UCurveFloat* TurningCurve;
UPROPERTY(EditAnywhere, BlueprintReadWrite, Category = "Orbital Movement")
float TurnOnSpotTolerance = 0.05f;
UPROPERTY(EditAnywhere, BlueprintReadWrite, Category = "Orbital Movement")
float FastTurnVelocityTreshold = 500.0f;
float OrbitAngularSpeed = 0.0f;
float CurrentOrbitAngle = 0.0f;
// ----------- Tilting
UPROPERTY(EditAnywhere, BlueprintReadWrite, Category = "Tilting")
float SmoothTiltRollSpeed = 5.0f;
UPROPERTY(EditAnywhere, BlueprintReadWrite, Category = "Tilting")
float SmoothTiltPitchSpeed = 5.0f;
UPROPERTY(EditAnywhere, BlueprintReadWrite, Category="Tilting")
FVector LineDownwardOffset = FVector(0.0f, 0.0f, -400.0f);
UPROPERTY(EditAnywhere, BlueprintReadWrite, Category = "Tilting")
FVector FrontArrowPos;
UPROPERTY(EditAnywhere, BlueprintReadWrite, Category = "Tilting")
FVector BackArrowPos;
UPROPERTY(EditAnywhere, BlueprintReadWrite, Category = "Tilting")
FVector RightArrowPos;
UPROPERTY(EditAnywhere, BlueprintReadWrite, Category = "Tilting")
FVector LeftArrowPos;
// ----------- Camera
UPROPERTY(EditAnywhere, BlueprintReadWrite, Category = "Camera", meta = (ClampMin = "1.0", ClampMax = "10.0", UIMin = "1.0", UIMax = "10.0"))
float HorizontalSensitivity = 10.0f;
UPROPERTY(EditAnywhere, BlueprintReadWrite, Category = "Camera", meta = (ClampMin = "1.0", ClampMax = "10.0", UIMin = "1.0", UIMax = "10.0"))
float VerticalSensitivity = 10.0f;
UPROPERTY(EditAnywhere, Category = "Camera", meta = (ClampMin = "0.1", ClampMax = "5.0", UIMin = "0.1", UIMax = "5.0"))
float MinSensitivityMultiplier = 0.1;
UPROPERTY(EditAnywhere, Category = "Camera", meta = (ClampMin = "0.1", ClampMax = "5.0", UIMin = "0.1", UIMax = "5.0"))
float MaxSensitivityMultiplier = 5.0f;
UPROPERTY(EditAnywhere, Category = "Camera", meta = (ClampMin = "0.0", ClampMax = "10.0", UIMin = "0.0", UIMax = "10.0"))
float TimeToResetCamera = 2.0f;
UPROPERTY(EditAnywhere, BlueprintReadWrite, Category = "Camera", meta = (ClampMin = "0.0", ClampMax = "10.0", UIMin = "0.0", UIMax = "10.0"))
float LookInactivityDelay = 2.0f;
UPROPERTY(EditAnywhere, BlueprintReadWrite, Category = "Camera")
float MaxPitchValue = 25.0f;
UPROPERTY(EditAnywhere, BlueprintReadWrite, Category = "Camera")
float MinPitchValue = -45.0f;
// ----------- Camera Shakes
UPROPERTY(EditAnywhere, BlueprintReadWrite, Category = "Camera-Shakes")
TSubclassOf DivingImmersionShakeClass;
UPROPERTY(EditAnywhere, BlueprintReadWrite, Category = "Camera-Shakes")
TSubclassOf EmersionShakeClass;
// ----------- Procedural Animations
UPROPERTY(EditAnywhere, BlueprintReadWrite, Category = "Procedural Anim")
UCurveFloat* BodyStrengthCurve;
UPROPERTY(EditAnywhere, BlueprintReadWrite, Category = "Procedural Anim")
UCurveFloat* TailStrengthCurve;
// ---------- Animations
UPROPERTY(EditAnywhere, BlueprintReadWrite, Category = "Animation")
UAnimMontage* HigherLandingAnim;
UPROPERTY(EditAnywhere, BlueprintReadWrite, Category = "Animation")
UAnimMontage* SoftLandingAnim;
In this code block you can see almost all the parameters used for the RayCharacter. Almost all those variables are part of the documentation shown at the end of the camera section.